Implementing Feature Flags in Azure Synapse Analytics with Azure App Configuration
A common technique used in software development is the use of feature toggles, or feature flags. These tools help us to accomplish continuous integration, delivery, and release on demand. They’re valuable in mitigating the risks associated with introducing changes, allowing us to continuously integrate and deploy with confidence.
What about in the world of data engineering? In this realm, too, feature flags can be quite handy! We can utilize them in our data pipelines to make changes to data ingestion, loading, and transformation processes fearlessly. If you’re using Azure Synapse Analytics, this translates to integrating feature flags directly into your data pipelines and notebooks.
So, how can we do this? There are many approaches, but in this guide, we’ll focus on a solution using Microsoft’s managed service offering, Azure App Configuration. This tool offers centralized application settings and feature flag management, providing a convenient way to modify our data systems’ behavior at runtime.
So let’s dive right into it!
Table of Contents
- Overview
- Prerequisites
- Creating an Azure App Configuration Store
- Integrating Azure App Configuration into Synapse Pipelines
- Integrating Azure App Configuration into Synapse Notebooks
- Conclusion
Overview
This post is divided into sections, guiding you on how to:
- Create an Azure App Configuration store.
- Integrate Azure App Configuration into Synapse pipelines.
- Integrate Azure App Configuration into Synapse (PySpark) notebooks.
Before starting, make sure you have all the prerequisites mentioned in the section below.
Bonus: I have also provided a GitHub repository with a ready-to-use utility pipeline and notebook. Check it out at bijancamp/synapse-feature-flagging. With these resources, you’ll be all set to integrate Azure App Configuration into your data engineering workflows.
Prerequisites
To securely integrate Azure App Configuration with Synapse, you will need:
- A resource group and Synapse workspace.
- Owner on the resource group.
- Synapse Administrator on the Synapse workspace. Alternatively, you can have Synapse Contributor (for pipeline and notebook integration) and Synapse Credential User (for notebook integration).
- Ability to create service principals in Azure AD (for notebook integration).
- The Microsoft.AppConfiguration resource provider registered in your target subscription.
- Az PowerShell (either installed locally or via Azure Cloud Shell).
Creating an Azure App Configuration Store
With your target subscription active in PowerShell, start by creating an instance of Azure App Configuration, also called an “App Configuration store”:
New-AzAppConfigurationStore `
-Name <store-name> `
-ResourceGroupName <resource-group-name> `
-Location <location> `
-Sku Free
Note: In Production, you’ll want to use the Standard sku if you have availability requirements or other needs.
To create and manage feature flags, you need the role of App Configuration Data Reader on the configuration store:
New-AzRoleAssignment `
-ObjectId (Get-AzADUser -SignedIn).Id `
-RoleDefinitionName "App Configuration Data Owner" `
-Scope (Get-AzResource -Name <store-name> -ResourceGroupName <resource-group-name>).ResourceId
To enable Synapse to access feature flags via pipelines, grant its managed identity App Configuration Data Reader:
New-AzRoleAssignment `
-ObjectId (Get-AzADServicePrincipal -DisplayName <synapse-workspace-name>).Id `
-RoleDefinitionName "App Configuration Data Reader" `
-Scope (Get-AzResource -Name <store-name> -ResourceGroupName <resource-group-name>).ResourceId
It can take up to 15 minutes for your user’s role assignment to sync, but once it does, you should be able to go to Operations > Feature manager on the App Configuration resource and see the following:
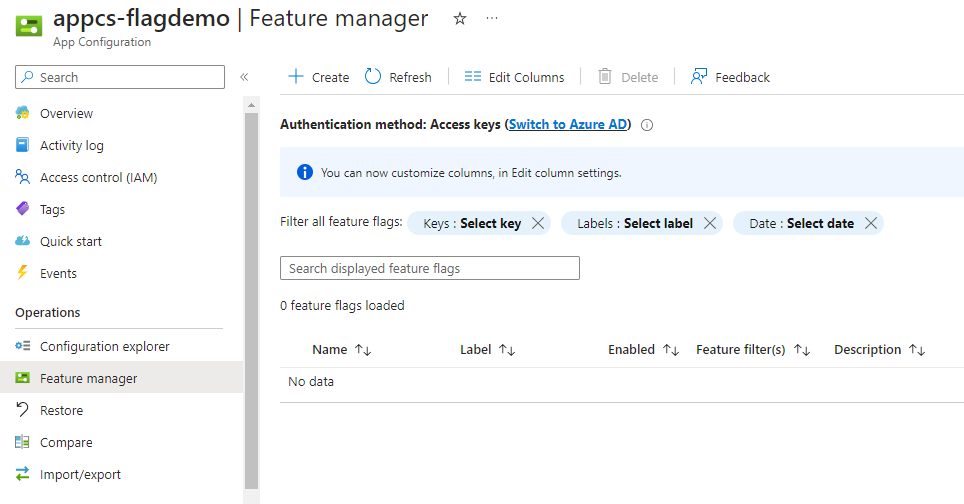
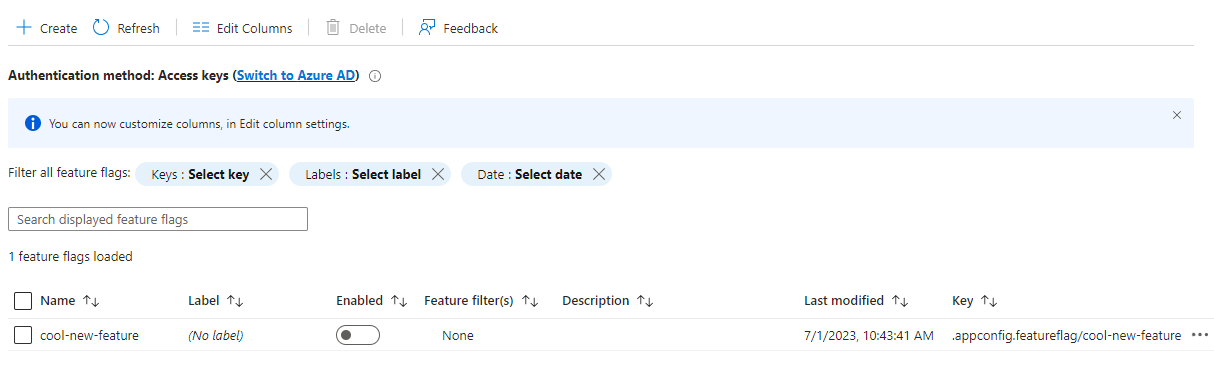
On this page, select “Create” and populate the resulting form with the following values:
| Setting | Value |
|---|---|
| Enable feature flag | Box is not checked. |
| Feature flag name | cool-new-feature |
Make sure to use cool-new-feature for the name since that will be the name used in the sample pipeline and notebook.
Your feature manager page should now look like the following:
Integrating Azure App Configuration into Synapse Pipelines
Setup
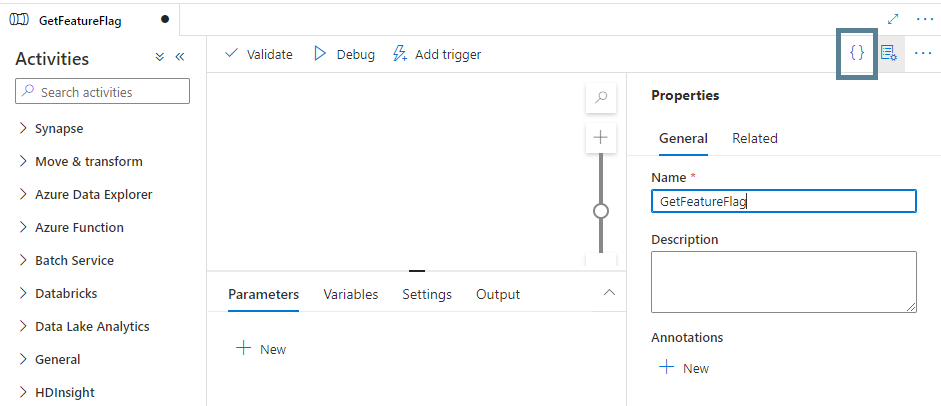
With our configuration store and cool-new-feature in place, we can proceed to create a Synapse pipeline that calls our App Configuration store. In Synapse Studio, create a new blank pipeline called GetFeatureFlag, and click the button in the upper-right corner to open the JSON editor:
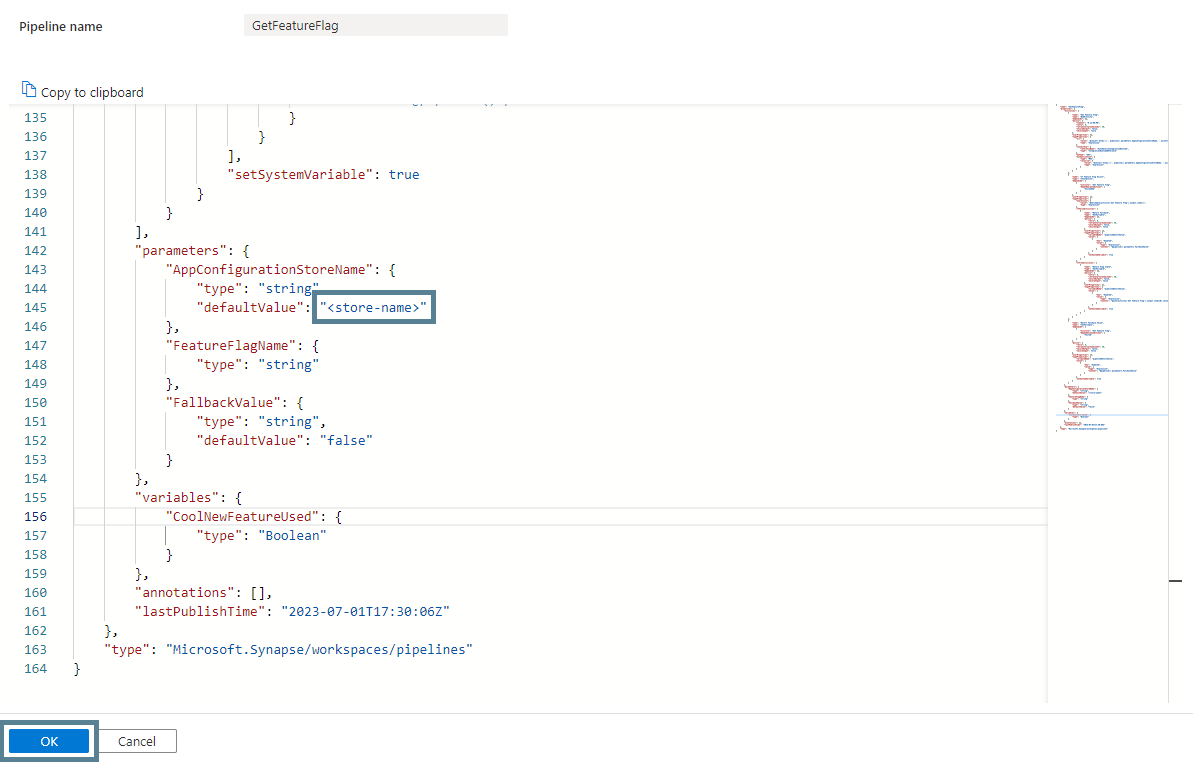
Copy the JSON code from the following file in the GitHub repository into the JSON editor window: bijancamp/synapse-feature-flagging/pipelines/GetFeatureFlag.json. In the copied JSON, replace <store-name> in the parameters section with the name of your App Configuration store and click “OK”:
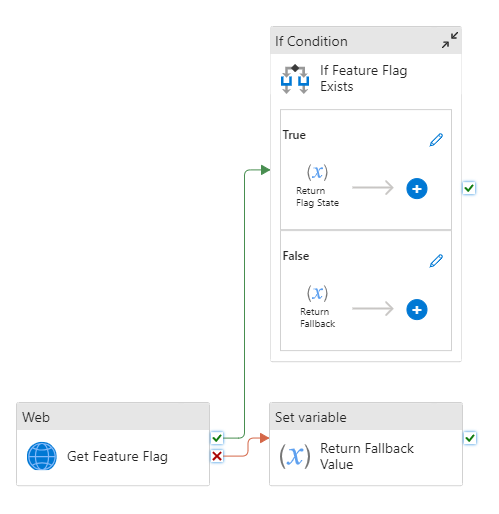
The GetFeatureFlag pipeline retrieves information about the feature flag specified via the FeatureFlagName parameter. It uses a Web activity and the Synapse managed identity to access the feature flag via the store’s endpoint. It also returns a customizable fallback value in case the call to the store fails or the feature flag does not exist. This is similar to the fallback value in LaunchDarkly (a popular third-party service for implementing feature flags).
Create another pipeline called UseFeatureFlag, and copy the JSON from the following file into its JSON editor: bijancamp/synapse-feature-flagging/pipelines/UseFeatureFlag.json.
This pipeline uses the GetFeatureFlag pipeline to look up the value of the cool-new-feature flag. If the flag is “enabled”, it executes an experimental branch of pipeline activities (i.e., runs an activity called “Used cool-new-feature”); otherwise, it executes the old logic of the pipeline (i.e., runs an activity called “Did Not Use cool-new-feature”).
Trying It Out
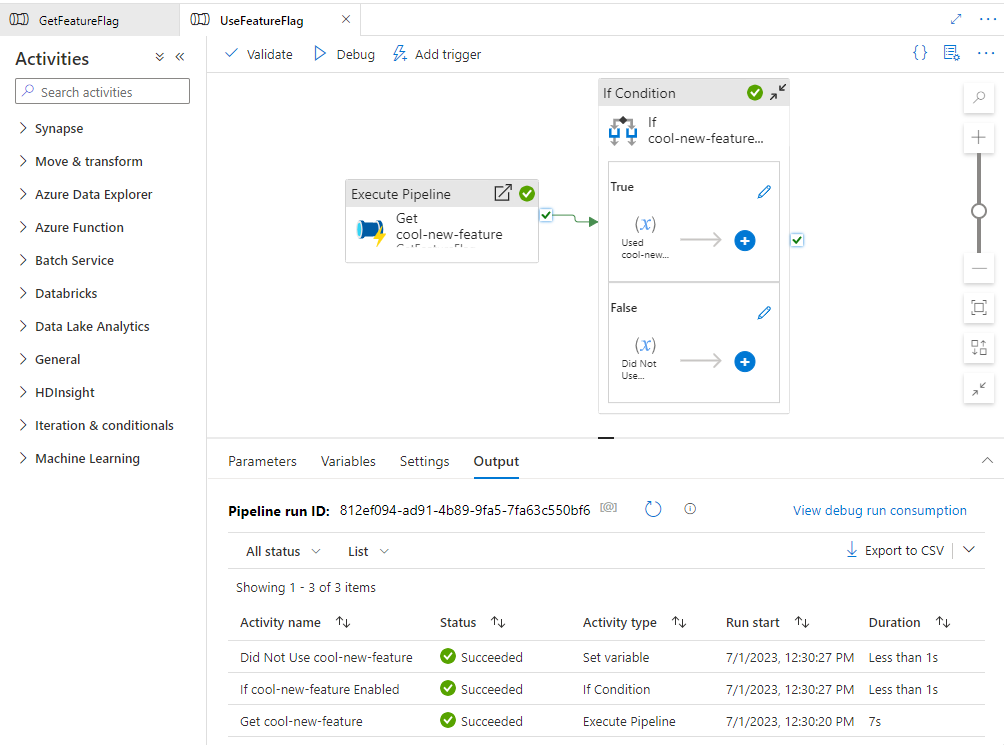
Now, let’s see it in action! In Synapse Studio, debug the UseFeatureFlag pipeline. It should succeed and execute the “Did Not Use cool-new-feature” activity:
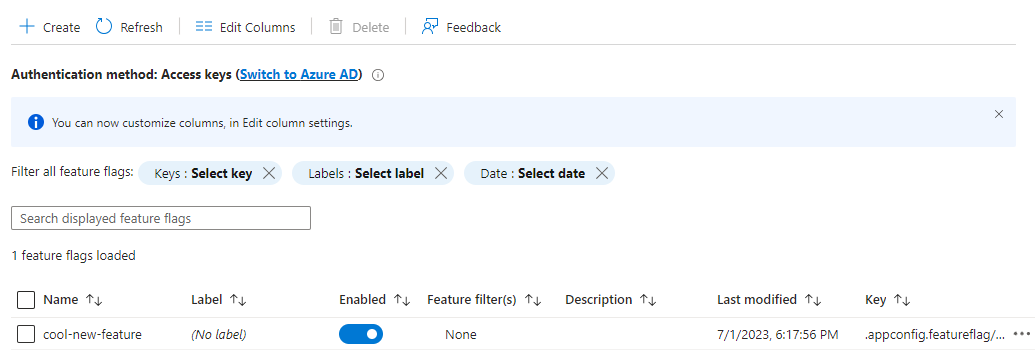
Now go back to the App Configuration resource in the portal, go to Operations > Feature manager, and enable the cool-new-feature flag:
Now debug the UseFeatureFlag pipeline again in SynapseStudio. This time, the pipeline executes the “Used cool-new-feature” activity:
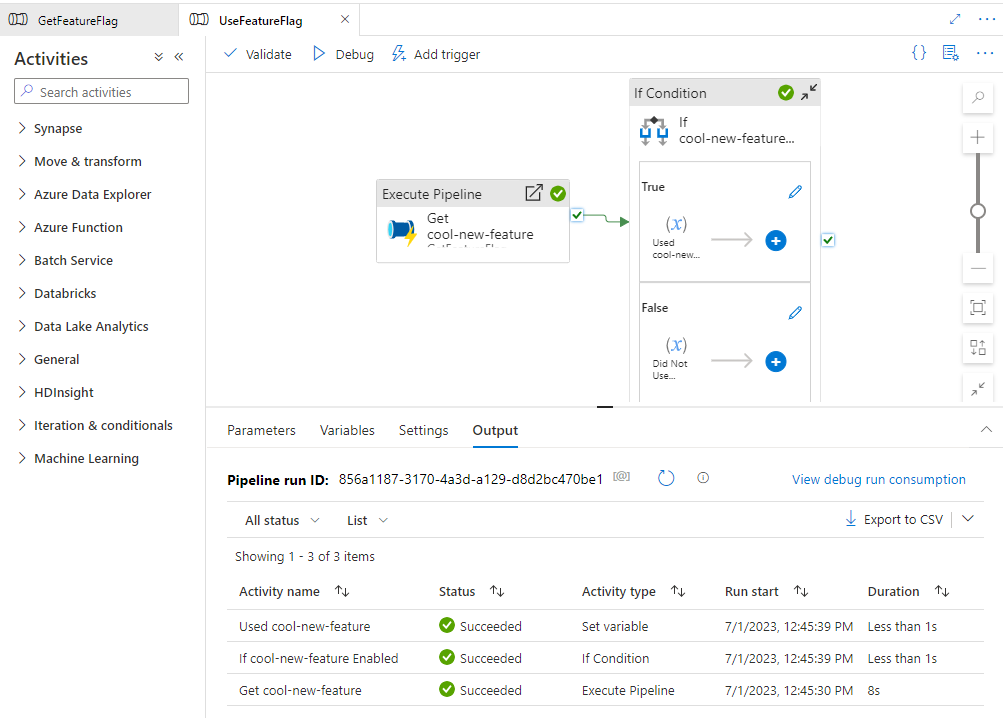
The pipeline has changed its runtime behavior based on an easily adjustable flag! If this pipeline was based on an existing one, you could now confidently promote this version across all your environments, knowing that the risk of breaking the existing pipeline is minimal.
Integrating Azure App Configuration into Synapse Notebooks
Setup
In this section, you will integrate Azure App Configuration with Synapse notebooks.
With your configuration store and cool-new-feature already set up, let’s start by creating a Spark pool:
New-AzSynapseSparkPool `
-WorkspaceName <synapse-workspace-name> `
-Name <pool-name> `
-NodeCount 3 `
-SparkVersion 3.3 `
-NodeSize Small `
-EnableAutoPause `
-AutoPauseDelayInMinute 15
Feel free to adjust the Spark version if there is a later one that you would like to try.
You will use the azure-identity and azure-appconfiguration packages to call the app configuration store from a PySpark notebook, so create a “requirements.txt” file:
azure-identity==1.13.0
azure-appconfiguration==1.4.0
The above requirements file pins the latest versions of the packages at the time of this writing, but feel free to try any newer versions that might be available.
Now upload the requirements file to the pool to install the packages:
Update-AzSynapseSparkPool `
-WorkspaceName <synapse-workspace-name> `
-Name <pool-name> `
-LibraryRequirementsFilePath <path-to-requirements-file>
It can take over 20 minutes for the above command to complete.
In the meantime, a service principal is needed for the Spark pool to access the feature flag within the configuration store. Before creating a service principal though, create a key vault to store its client secret and other information:
New-AzKeyVault `
-Name <vault-name> `
-ResourceGroupName <resource-group-name> `
-Location <location> `
-EnableRbacAuthorization
To add secrets to the key vault, grant yourself Key Vault Secrets Officer:
New-AzRoleAssignment `
-ObjectId (Get-AzADUser -SignedIn).Id `
-RoleDefinitionName "Key Vault Secrets Officer" `
-Scope (Get-AzResource -Name <vault-name> -ResourceGroupName <resource-group-name>).ResourceId
Also, the Synapse managed identity needs Key Vault Secrets User in order for the Spark pool to be able to retrieve secrets:
New-AzRoleAssignment `
-ObjectId (Get-AzADServicePrincipal -DisplayName <synapse-workspace-name>).Id `
-RoleDefinitionName "Key Vault Secrets User" `
-Scope (Get-AzResource -Name <vault-name> -ResourceGroupName <resource-group-name>).ResourceId
In Synapse Studio, add a linked service for the key vault. Use System Assigned Managed Identity for the authentication method.
Now, create the service principal for the Spark pool:
$sp = New-AzADServicePrincipal -DisplayName <service-principal-name>
Convert the values we need to secure strings:
$tenantId = ConvertTo-SecureString (Get-AzContext).Tenant.Id -AsPlainText -Force
$clientId = ConvertTo-SecureString $sp.AppId -AsPlainText -Force
$clientSecret = ConvertTo-SecureString $sp.PasswordCredentials.SecretText -AsPlainText -Force
And create the following secrets in the key vault:
Set-AzKeyVaultSecret -VaultName "<vault-name>" -Name "azure-tenant-id" -SecretValue $tenantId
Set-AzKeyVaultSecret -VaultName "<vault-name>" -Name "synw-notebook-sp-client-id" -SecretValue $clientId
Set-AzKeyVaultSecret -VaultName "<vault-name>" -Name "synw-notebook-sp-client-secret" -SecretValue $clientSecret
For the new service principal to be able to retrieve feature flags from the store, grant it App Configuration Data Reader on the store:
New-AzRoleAssignment `
-ObjectId (Get-AzADServicePrincipal -DisplayName <service-principal-name>).Id `
-RoleDefinitionName "App Configuration Data Reader" `
-Scope (Get-AzResource -Name <store-name> -ResourceGroupName <resource-group-name>).ResourceId
With the above completed (and once the Spark pool has finished installing the packages from the requirements file) we should now have all the infrastructure and access in place for the pool to communicate with the configuration store.
Now, download the utility and sample notebooks for querying your feature flag store:
- bijancamp/synapse-feature-flagging/notebooks/GetFeatureFlag.ipynb
- bijancamp/synapse-feature-flagging/notebooks/UseFeatureFlag.ipynb
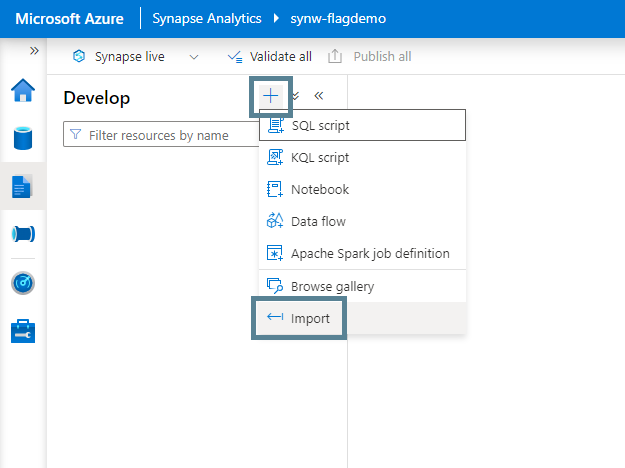
In Synapse Studio, import these notebooks by going to the Develop Hub and clicking the “+” button and then “Import”:
With both notebooks imported, open the GetFeatureFlag notebook and replace <store-name>, <vault-name>, and <vault-linked-service-name> in the parameters cell with the names of your resources, and then publish the notebooks.
These notebooks are similar in design to the pipelines. The GetFeatureFlag notebook uses Microsoft Spark Utilities (MSSparkUtils) to retrieve the key vault secrets, ClientSecretCredential to create an object out of the secrets, and AzureAppConfigurationClient to retrieve the feature flag from the store. Like the pipeline, it returns a fallback value if an exception occurs when calling the store.
The UseFeatureFlag notebook calls the GetFeatureFlag notebook, passing in a value of cool-new-feature for the featureflag parameter.
Trying It Out
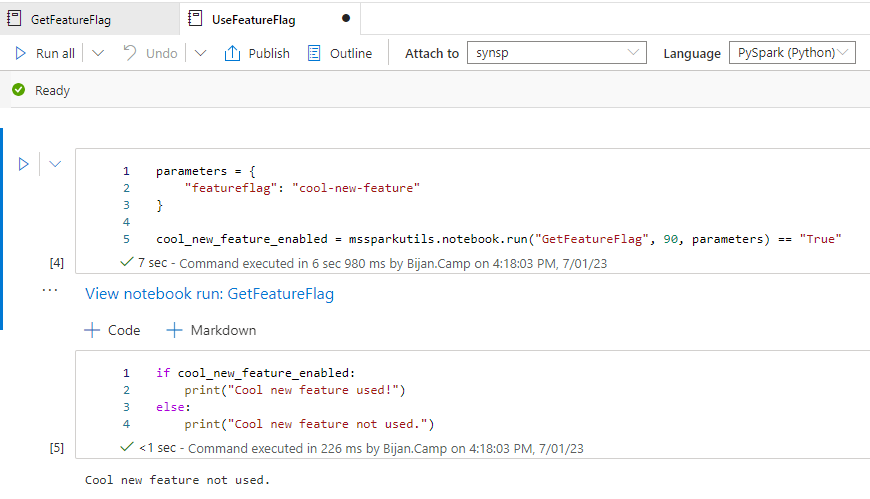
Back in your App Configuration resource, disable the feature flag.
Now in the UseFeatureFlag notebook in Synapse Studio, attach your Spark pool and click the “Run all” button. After it runs, it should display “Cool new feature not used”:
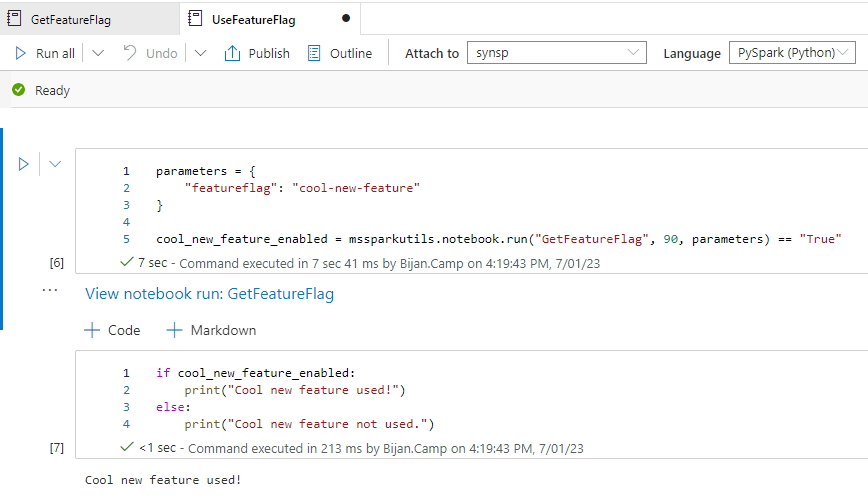
Now enable the feature flag and run the notebook again. This time, it will print “Cool new feature used”:
Conclusion
And there you have it! You have successfully utilized feature flags in Synapse without having to build your own feature management solution or rely on a non-Azure service. With this methodology, you can roll out and roll back features with greater control and ease.
Given that there are a multitude of ways to implement feature flags, how have you implemented feature flags in your Azure data analytics solutions? What challenges did you face and how did you overcome them? Share your thoughts and learnings in the comments below!
Happy continuous integration and deployment! 🚀